Search This Blog

Showing posts with label online presence. Show all posts

Thursday, June 2, 2011

Google Launches +1 button & Twitter Launches The Follow Button for Websites!

Twitter and Google have each launched, respectively, a Follow and +1 button for use on your website. Increase your online reach and opportunities among potential residents! Your status and availability will increase when visitors to your site can in one-click Follow you on Twitter or in one-click +1 you to their Google friends. Visitors who follow your business via social media are more likely to interact with your business, recommend you in their networks, retweet/repost your information.


Twitter's Follow
Twitter launched the Follow button for use on websites May 31, 2011. This Follow button allows all visitors of your site to click their mouse once and begin following your business on Twitter. You can customize the button with a background color, your follower count, and language choice.


Google's +1
Google launched the +1 button for websites on June 1, 2011. The +1 button serves as a tour guide in Google search results. Internet users logged in to their Goggle accounts are now able to recommend websites by clicking the +1 button instead of copying the link to share in an email, on Facebook, Twitter, a blog, or use on other sites. By simply clicking the +1 button users visiting your site will recommend you to their friends, networks, and the world. A user's +1 will show on your website and next to your website in any Google search or on Search Ads.

Read more here or watch the video below for a quick overview.


Let us know how these buttons affect your websites!

Friday, May 13, 2011

Show Off Your Community! Tag Your Page in Facebook Photos!

Facebook users can now tag Pages in photos just like they tag their friends! Users can tag a Page without having 'liked' the Page. Currently, users can only tag Pages in the following categories:
-- Brand & Products
-- People

However, administrators can tag their page in photos regardless of the Page's category. Facebook is looking to allow users to tag more Pages (in reference to category) in the future.


Tag Your Business Page in Facebook Photos!


Privacy
Tagged photos will display in the Photos tab on the Page.

Tagged photos will respect the Page's current settings.
  • Photos published to 'Everyone' will appear publicly on the Photos tab of the Page
  • Photos published to "Friends Only" will only appear to their friends.
  • Administrators can disable tagged photos from appearing on the Photos tab by going to the Edit Page > Posting Options > unchecking "Users can add photos."
Read more about Facebook's launch: Photo Tagging For Pages.


Are you going to start tagging brands and your community in photos?

Ideas! Tag your community in photos that....
residents post of resident events!
staff posted of the community on their personal pages!
show your community grounds or models!

Sunday, May 8, 2011

Yahoo! We've claimed our listing. Have you? Claim it. Own it. Rock it!

Yahoo! Local is a self contained search engine and is intricately incorporated with Yahoo! search engine. On your basic business listings, you can add your community location, phone number, website, categories, spoken languages, apartment descriptions, specials, hours, professional affiliations, and much more. If you upgrade to an enhanced listing you can add a business description, logo, photos, company tagline, and offer online coupons.


How to Claim Your Business Listing on Yahoo! Local


1. Go to Yahoo! Local's website. Click on the ‘Sign Up’ button.
2. Sign in to Yahoo! or click ‘Create New Account’ and follow the instructions.
3. Enter in all the requested information: Account Contact Information, Listing Information, Hours of Operation, Payment Methods You Accept, Additional Information, and a Master Category and a Sub-Category.’
5. Preview your listing’s information. Edit any information as needed and click ‘Submit.’
6. Enter the validation code and click ‘I Agree’ under Terms of Service.


Troubleshooting

Access Yahoo! Help Center here.


How many business listings have you claimed? What techniques and sites have you found work best for your community?

Saturday, May 7, 2011

Have You Found Your Listing on Citysearch? Claim it. Own it. Rock it!

Citysearch is a branch of CityGrid media (which includes CityGrid, Urbanspoon, and Insider Pages) which provides contact information, social media links, an integrated Twitter feed, and reviews of local businesses.

Citysearch listings reach 100 million people (as of January 2010) by distributing Citysearch's listing content to over 100 sites and mobile applications such as UpNext and other geo-location applications.


How to Claim Your Business Listing on Citysearch

1. Go to Citysearch.com and search for your community using the search engine. Click on your community’s name.
2. Click the ‘Own this Business?’ link located on the lower right of your contact information.
3. Enter your information to create a CityGrid Media account or click ‘Sign In’ to login with your CityGrid Media account.
4. Enter any additional information about your community and links to your Facebook and Twitter accounts. Click the Save button.


Troubleshooting
To create a listing on Citysearch go here.

To edit your business listing in the future, sign in to CityGrid Media's website.

To manage reviews you will need to upgrade your listing. Contact CityGrid Media's Customer Service at myaccount@citygridmedia.com or (800) 611-4827: Monday – Friday, 9:00 am. – 10:00 pm EDT.


What do you think of the integration of Twitter feeds and @mentions on your business listing?

Friday, May 6, 2011

Bing is Sounding Out a New Service for Business Owners! Claim it. Own it. Rock it!

Bing launched the Bing Business Portal Beta on April 14, 2011. Bing Business Portal Beta has replaced the Bing Local Listing Center (LLC), and all listing on the LLC have been transferred to the Business Portal Beta. Claim or revisit your business listing to add the new and exciting features of the Bing Business Portal Beta:
  • QR Codes - Bing now offers a QR code to link visitors to your free Bing mobile website! Bing is looking into including MS Tags in future launches of the Business Portal.
  • Photos - You can now upload photos of your community, staff, and events!
  • Color election - You can select a primary color, secondary color, tertiary color, background color, and a background texture.
  • Deals - Offer discount coupons or promotions which will display on Bing search results, the Deal tab for mobile browsers, your Bing listing, and even your Facebook page. Read more about Bing Deals.


How to Claim Your Business Listing on Bing


1. Go to the Bing Business Portal. Click ‘Add new listing.’
2. Enter your community’s information and click the ‘Search’ button.
3. If your community displays as a result, click the 'Claim' button, and continue to step 4. Otherwise, click the 'Add new listing' button and continue to step 5.
4. Enter the CAPTCHA code, and click the 'Continue' button. Skip to step 6.5. Enter your community's information and CAPTCHA code. Proceed to step 6.

6.. Sign in with your Windows Live ID or click ‘Sign up’ and follow the instructions.
7. Enter your community's information:
  • Contact information
  • Social media sites
  • Logo
  • Specialties: Real estate> Buildings > Apartments
  • Mobile site: FREE - creation of site and QR code
  • Photos
  • Tagline & description
  • Parking options & Business hours
  • Edit colors displayed on your sites
  • Much more!
8. Request verification by phone or mail. Phone verification can be completed in minutes. Mail verification would be best for communities with an automated answering service.


Troubleshooting
Questions about QR Codes? Read our blog post QR Codes: A Scan Above the Rest!


Let us know what you do with your QR code for your mobile site!

Thursday, May 5, 2011

Shout To The World, I'm on Yelp! Claim it. Own it. Rock it!

Yelp is a great social network where millions of users visit each month in search of local businesses. Yelp has evolved to incorporate mobile services where users can check-in at locations to leave reviews and advance within the Yelp "royalty." Claiming your business listing is free, and once complete, you will be able to perform the following actions:
  1. Respond to reviews
  2. Add announcements (events/offers)
  3. Upload unlimited photos
  4. Enhance listing with a contact information, business hours, description, business history, your specialties, and more.
  5. View analytics (number of visitors per week/month)
  6. Use the “Recommended Business” feature to link to sister properties.
  7. Promote your business with Offers - Business Page Offers and Check-in Offers.


How to Claim Your Business Listing on Yelp

1. Go to Yelp.com. Search for your community’s name and your city and state in the search boxes. Click the ‘Search’ button.
2. Locate the listing of your community and click on your community’s name.

3. Click on the ‘Claim This Business’ button at the bottom left of the page.

4. Click the ‘Go To Step 1’ button.

5. Fill out your information in the respective fields and click the ‘Continue’ button. If you already have a business owner account, click the “Login here to add a business’ link to enter your log in information.

6. Return to your email account and open the email from Yelp. Click on the verification email in the email. On the pop-page on Yelp, click on the ‘Complete Your Page Now’ link.

7. Add your information in the respective fields and click the ‘Publish & Continue’ button or click the ‘Skip this step’ link at the bottom of each page.

8. Review your business information. Edit any information as needed.


Troubleshooting

If you have more than one listing, go here and report all the duplicate listings to Yelp.

You can access the Business Support Center here.


What successes or failures have you experienced with Yelp?

Wednesday, May 4, 2011

Where Are You on Facebook Places? Claim it. Own it. Rock it!

Facebook is one of the most trafficked sites in the world with over 500 million active users (as of July 2010) collectively spending over 700 billion minutes on Facebook each month. Optimize your presence on Facebook by merging your Business Page with your Places Page(s). Claiming your Facebook Places page(s) will ensure all the information provide is accurate and up-to-date, and the claimed Places page(s) will add the following aspects to your Business Page:
  • interactive map of your location
  • option to get directions to your location
  • 'Friends Activity' tab: shows the check-ins at your location
  • 'Deals' tab: deals for users who check-in at your location
  • number of check-ins visible in left column of page

Follow the instructions below to claim your Facebook Places page(s) which will merge with your Facebook Business Page.

Read our previous posts about Facebook:
March 31: Facebook Profiles and Business Pages...So, What's the Difference?
February 25: Why Wait? Upgrade Your Facebook Page TODAY!


How to Claim Your Facebook Places
  1. Log in to your Facebook account at Facebook.com.
  2. Type in your community’s name in the search engine and select your ‘Places’ listing. If there are too many results or you do not see the appropriate result, click the 'See more results'' link at the bottom of the drop down list. Find and click on your 'Places' listing(s).
  3. Click the ‘Is this your business?’ link located near the bottom of the left column.
  4. Click on the checkbox in the pop-up box to certify you are a representative of your community, and click the ‘Proceed with Verification’ button.
  5. Enter the requested information and click the ‘Submit’ button. I would recommend adding a claimed and updated 3rd party listing (see earlier post for claiming Google Places listing) to possibly help speed up the verification process.
  6. Enter either your company email (must include business domain name: example rachel@capturethemarket.com) or a scanned utility or phone bill which includes your business name and business address. Click the checkbox, and click the 'Submit' button.
  7. Facebook will review your submitted information, and will email you once the verification is complete.


Troubleshooting

This verification process has been known to take up to 6 months. Be patient.

If you do not have a Facebook Places
1. Download the Facebook application on your smart phone and/or log in to the Facebook application.
2. Click on the ‘Places’ icon in the middle of the screen.
3. Click on the ‘Check In’ button in the upper right corner of the screen.
4. Type your community’s name into the search engine.
5. Click on the ‘Add "[Your Community]"’ link.
6. Add a short description about your community.
7. Click the ‘Add’ button in the upper right corner of the screen.


Visit our Facebook Business Page and see the effect of merging your Facebook Places with your Business Page.

Tuesday, May 3, 2011

Foursquare. Claim it. Own it. Rock it!

Foursquare increased by over 15 million venues and experienced more than a half billion check-ins during the past two years alone. Take advantage of the opportunity this site presents!

Your venue is visible to the 7.5 million Foursquare users (number from March 2011). Entice potential residents with Specials offering a waived application fee or a gift card for leasing an apartment, provide pictures of the community, and a link to your Twitter account for updates! Follow the steps below to claim your venue and access the potential your venue holds!

Read our previous posts about Foursquare:
April 28 - Check In on Your Foursquare Venue! New Category Available!

April 21 - "Turning Life Into a Game" is going one step further!
April 13 - Celebrate Foursquare Day this Saturday, April 16!
March 24 - The Scramble to Become Mayor! Information about Foursquare


How to Claim Your Venue on Foursquare

1. Sign in to Foursquare.com and search for your community. If you do not already have an account, create a free account at foursquare.com using your Facebook login or an email address.
2. Click on the ‘Claim here’ link under the ‘Mayor’ box in the right column.
3. Click the ‘Continue claiming this venue’ link. Click the ‘Yes’ link on the next page. Click the ‘Continue with the claim’ link on the next page.
4. Click the ‘One of a kind with one location’ link.
5. Click the ‘Yes’ link to verify using the office phone, or click the ‘No, let’s try a different way’ link to verify through the postal service.
6. Enter your phone number in the provided box, click the ‘Verify’ button. You will receive a phone call. Follow the provided instructions.


Troubleshooting
If your community does not have a venue, you can create a new venue here.

Enter in all your contact information, Twitter account if applicable, and add the category 'Apartment Building' found in the 'Home, Work, Other' option.

If you'd like more information on Foursquare you can visit their merchant site, or I can email you a Foursquare 101 one sheet. Comment or email me with any questions.


Let us know how Foursquare has benefited your business!
Have Specials brought in more prospective residents?
Remember to check your venue Stats to see measure the impact your Specials!

Monday, May 2, 2011

Google Places on Google Maps! Claim it. Own it. Rock it!

Your listing on Google Places affects the information provided on Google Maps. Google Maps obtains information from many different sources; as Google states, "our listings combine information from our web search results, data submitted directly by local business owners, and third-party sources such as publicly available Yellow Pages directories."

By claiming your Google Places listing, you can instill confidence in internet users visiting your listing because the information you provide will be marked as 'by owner' and displayed at the top of your listing on Google Maps. This information includes the following:
  • location: street address
  • phone and fax numbers
  • email address
  • website
  • short description
  • categories for your business
  • business hours
  • payment options
  • photos
  • videos
  • additional information: type of parking available
See the two sets of instructions below to claim your business listing on Google Places and start adding high priority results to Google's search engine!


How to Claim Your Business Listing in Google Places on Google Maps


1. Go to http://www.maps.google.com. Search for your community using the search engine. Click on ‘more info’ to the right of your community’s name. If Google Maps cannot locate your community, click the ‘Report a problem’ link under the list of search results and follow instructions titled "How to Create a Business Listing with Google Places on Google Maps" later in this post.
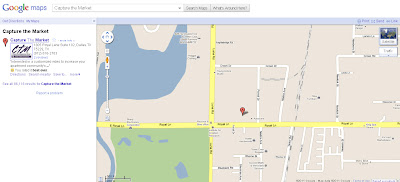
2. Click ‘Business owner?’ located at the top right of your listing.
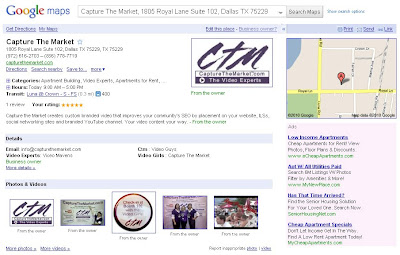
3. Login to your Google Account or click ‘Create an Account Now’ and follow the instructions.
4. Choose ‘Edit my business information’ and click ‘Continue.’
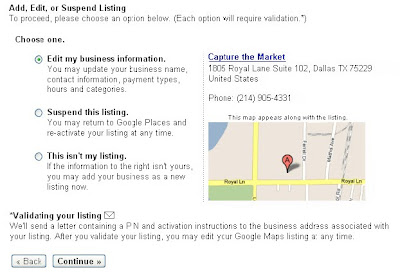
5. Enter the requested information and click ‘Submit.’
6. Choose to verify via phone call, SMS or text, or postcard. Recommendation: phone call.
7. Verify ownership by entering the PIN.


How to Create a Business Listing with Google Places on Google Maps

1. Go to http://www.maps.google.com. Search for your community using the search engine. If Google Maps cannot locate your community, click the ‘Report a problem’ link under the list of search results.
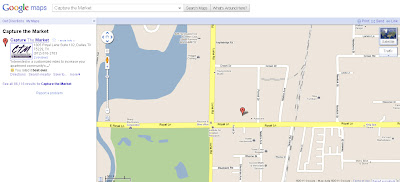
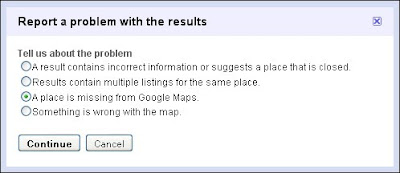
2. Choose ‘A place is missing from Google Maps’ and click ‘Continue.’
3. Login to your Google Account or click ‘Create an Account Now’ and follow the instructions.
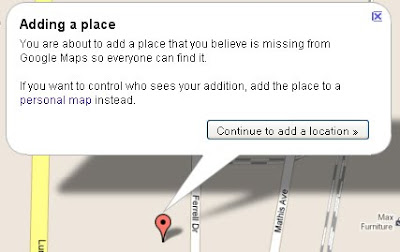
4. Click ‘Continue to add a location.’
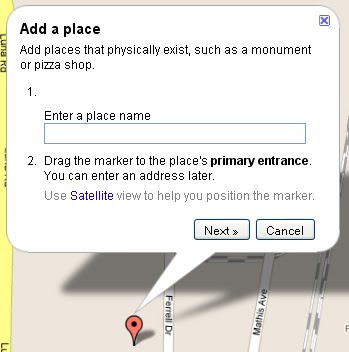
5. Enter your community’s name, click and drag the marker to your community entrance if needed, and click ‘Next.’
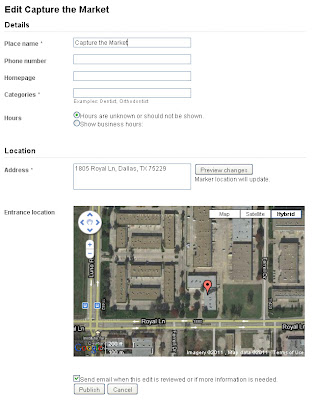
6. Enter all of your community’s information: Place Name, Phone Number, Homepage (if applicable), Categories (apartments, apartment building, furnished apartments etc), Hours, and Address. Click the checkbox next to ‘Send email when this edit is reviewed…’ and click ‘Publish.’


Troubleshooting

If you haven’t heard from Google in a couple of days, go to http://www.maps.google.com. Search for your community using the search engine. If you find your community, follow the steps on Page 1.

Thursday, April 28, 2011

Check In on Your Foursquare Venue! New Category Available!

The day has finally arrived! Foursquare has added 'Apartment Building' as a category option for Foursquare venues. Adding this category to your venue will help your community display in the results for searches by your target audience! To add the 'Apartment Building' category to your venue follow these steps:

How To Add a Category to Your Venue
  1. Go to your venue. Click on a link or search for your community on Foursquare.com.
  2. Click the 'Edit' button in the lower right corner of your venue information.
  3. Select 'Home, Work, Other' from the drop-down menu in the 'Add a category' section.
  4. Select 'Apartment Building' from the new drop-down menu option.
  5. Click the green 'Add Category' button.

There's No 'Edit' Button?!


If you do not see the 'Edit' button on your venue, then you still need to claim your venue.

We will walk through the steps for How to Claim Your Foursquare Venue on Tuesday, May 3 during our week of "Your Online Presence - Claim it. Own it. Rock it!" You can also email me for instructions at Rachel@CaptureTheMarket.com.